

📌 이 글은 권철민님의 딥러닝 컴퓨터 비전 완벽 가이드 강의를 바탕으로 정리한 내용입니다.
목차
- MMDetection
- MMDetection Config
- MMDetection Model Architecture
- MMDetection Training Pipeline
- MMDetection Dataset
- MMDetection Custom Dataset Format
- 실습
- MMDetection 설치
- MS-COCO 데이터 기반으로 Faster RCNN Pretrained 모델을 활용하여 Inference 수행
- Model의 Config 설정 확인하기
- array를 inference_detector()에 입력할 경우에는 원본 array를 BGR 형태로 입력 필요(RGB 변환은 내부에서 수행하므로 BGR로 입력 필요)
- show_result_pyplot()을 이용하지 않고, inference 결과를 image로 표현하기
MMDetection

- 칭화 대학(중국, 베이징시)의 주도로 만들어진 Computer vision Open Source project인 OpenMMLab에서 출발
- 2018년 MS-COCO Challenge에서 우승 후 모듈을 확장하여 다수의 알고리즘 수용
- 최신의 다양한 Object Detection, Segmentation 알고리즘을 Package로 구현 제공.
- 뛰어난 구현 성능, 효율적인 모듈 설계, Config 기반으로 데이터부터 모델 학습/평가 까지 이어지는 간편한 파이프라인 적용
- Pytorch 기반으로 구현
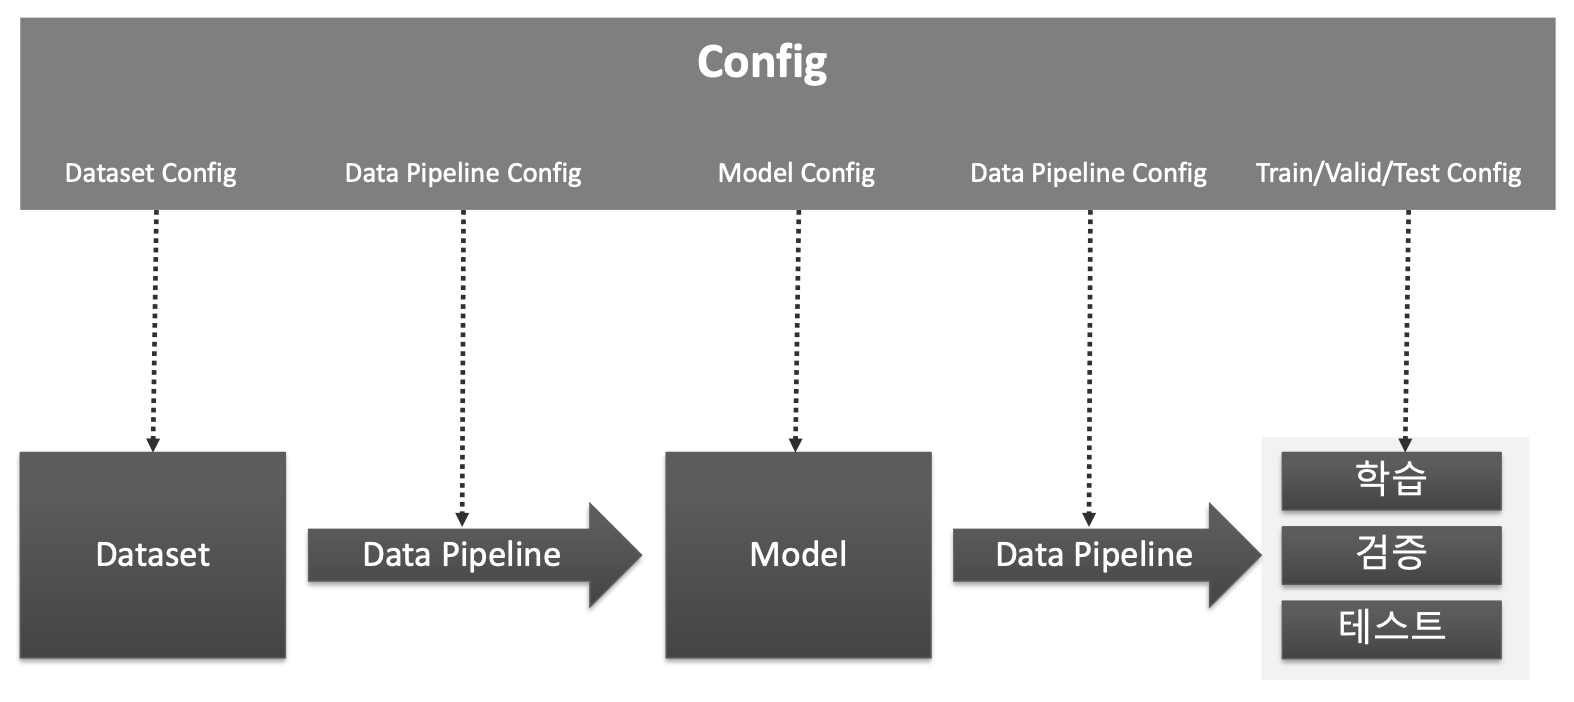
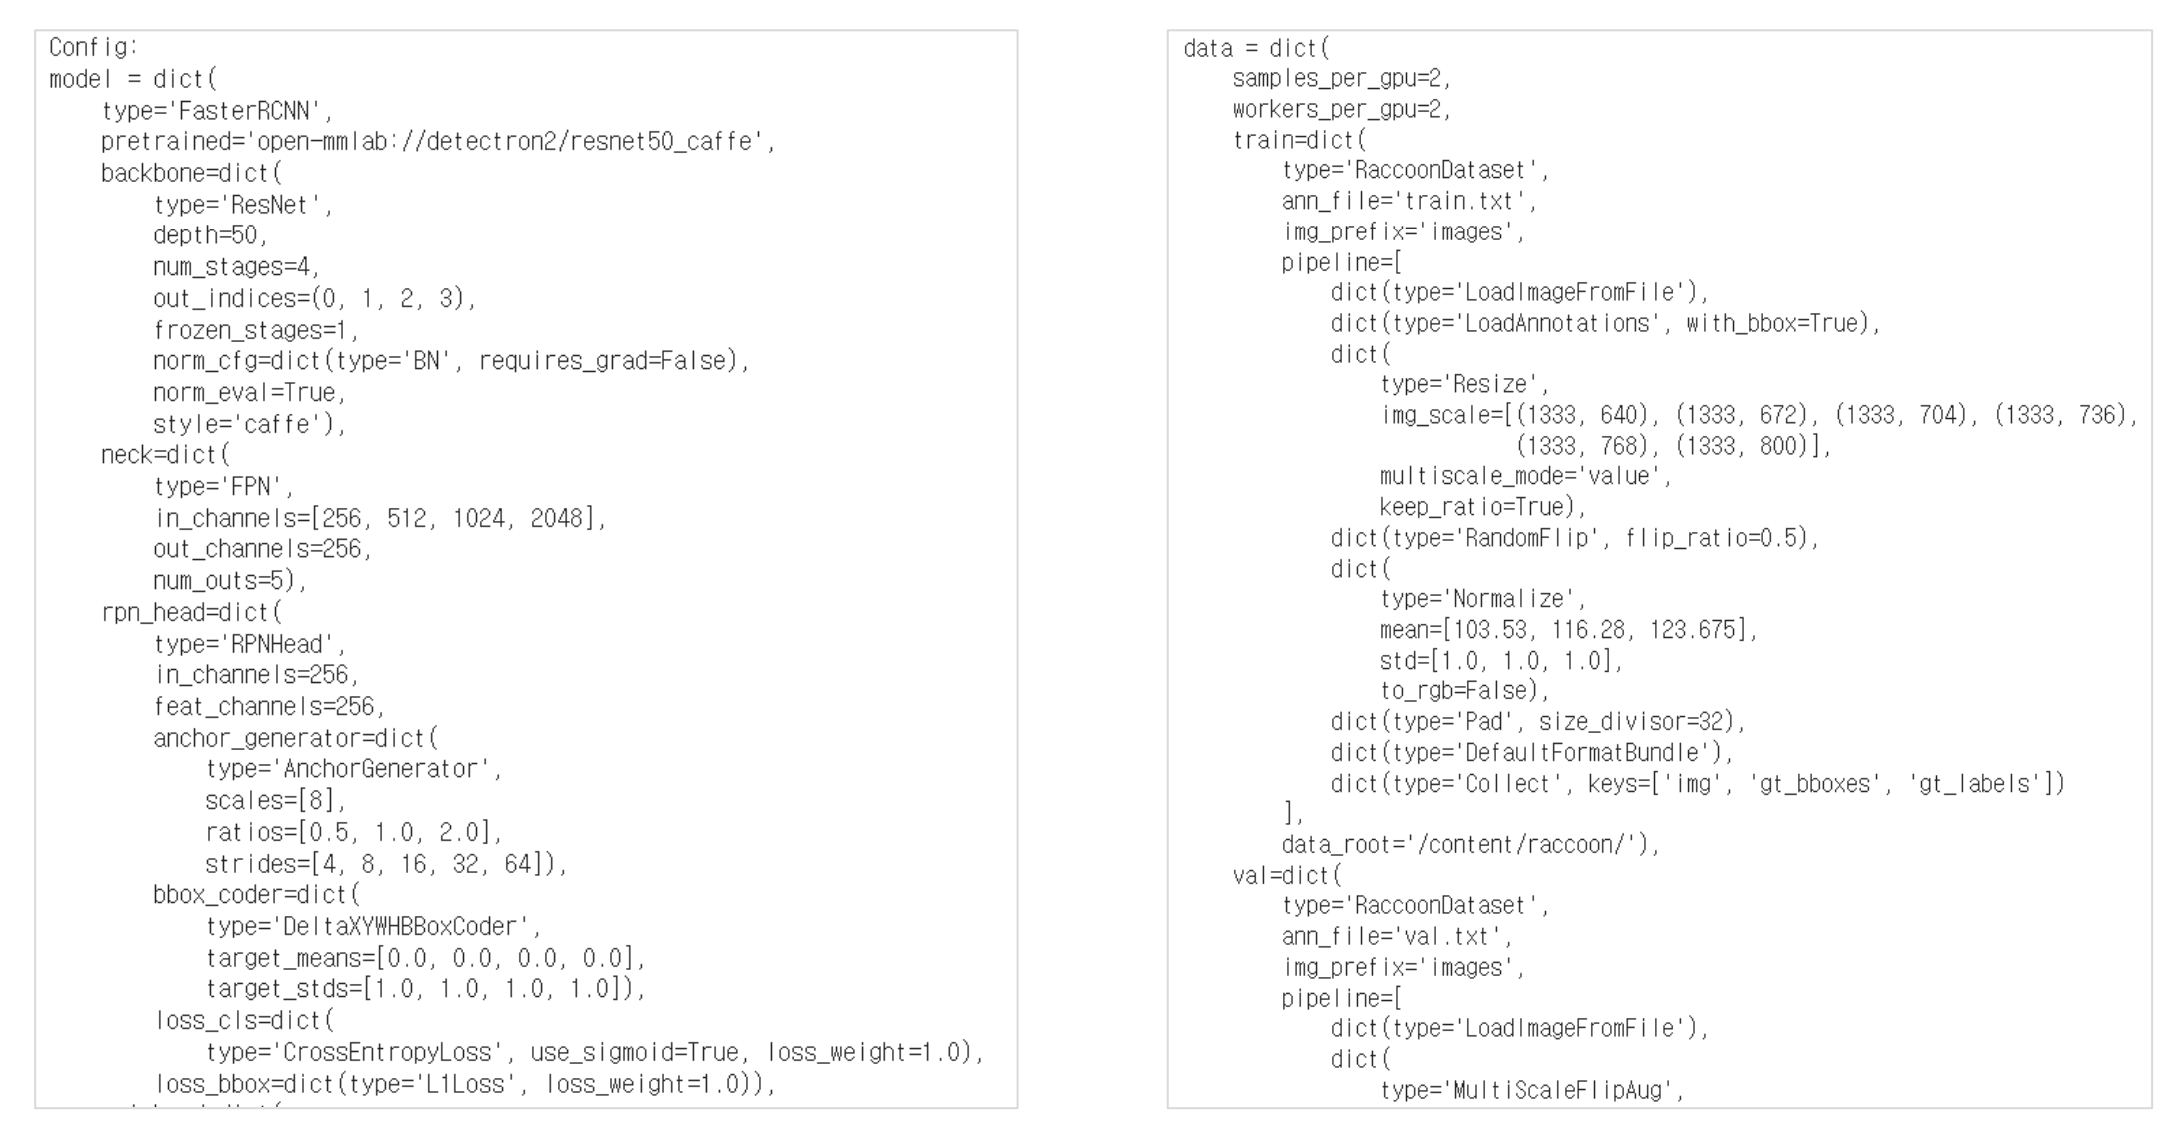
MMDetection Config
MMDetection Model Architecture
- Backbone : Feature Extractor(이미지->Feature Map)
- Neck : Backbone과 Heads를 연결하면서 heads가 feature map 의 특성을 보다 잘 해석하고 처리할 수 있도록 정제 작업 수행.
- DenseHead : Feature Map에서 Object의 위치와 Classification을 처리하는 부분
- RoIExtractor : Feature Map에서 ROI 정보를 뽑아내는 부분
- RoIHead (BBoxHead/MaskHead): ROI정보를 기반으로 Object 위치와 Classification을 수행하는 부분
MMDetection Training Pipeline

MMDetection Dataset

MMDetection Custom Dataset Format
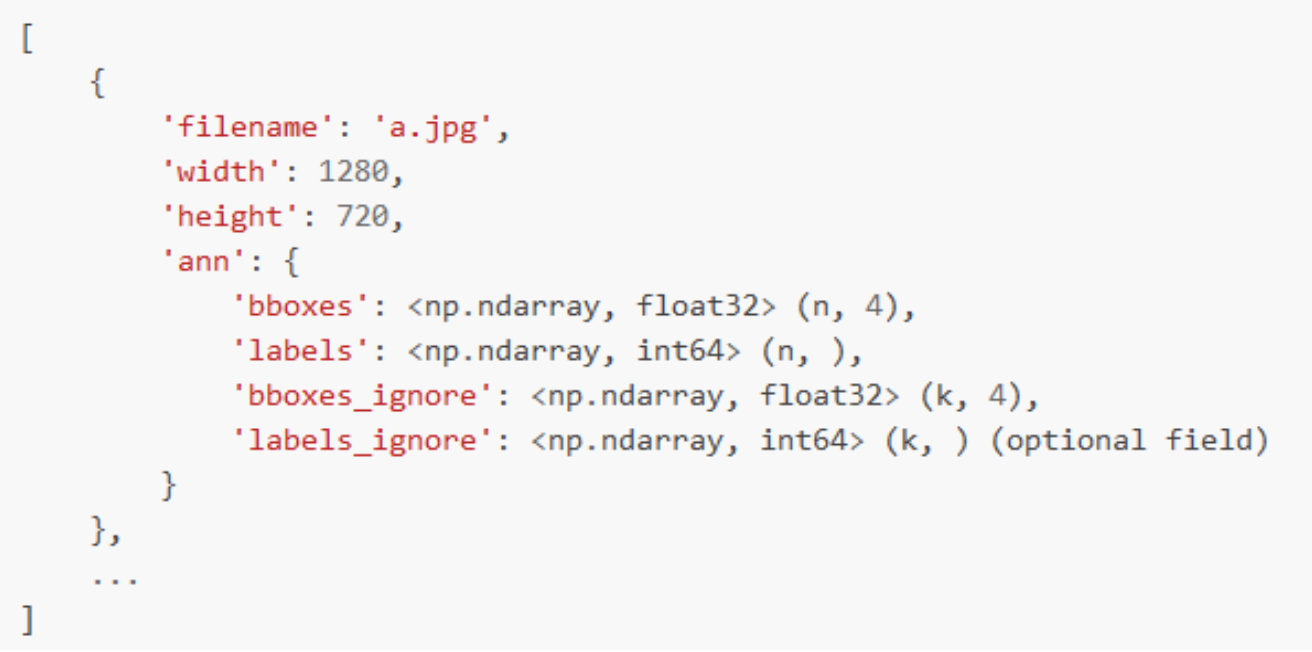
- MSCOCO랑 비슷한 스타일
- 모든 이미지들에 대한 annotation 정보를 list 객체로 갖는다.(하나의 이미지 파일에 대한 annotation)
- list 내의 개별 원소는 딕셔너리로 구성됨.
- 딕셔너리 - 1개 이미지에 대한 정보 - 여러개의 Bounding box + label annotation 정보
- 1개의 이미지는 여러개의 bbox와 label annotation정보들을 개별 딕셔너리고 갖는다.
실습
MMDetection 설치
- 강의 영상에는 pip install mmcv-full로 mmcv를 설치(약 10분 정도의 시간이 소요)
- 실습코드는 pip install mmcv-full -f https://download.openmmlab.com/mmcv/dist/cu111/torch1.9.0/index.html 로 변경(설치에 12초 정도 걸림).
import torch
print(torch.__version__)
!pip install mmcv-full -f https://download.openmmlab.com/mmcv/dist/cu111/torch1.10.0/index.html

# mmdetection 설치

!git clone https://github.com/open-mmlab/mmdetection.git

!cd mmdetection; python setup.py install
# 아래를 수행하기 전에 kernel을 restart 해야 함.
from mmdet.apis import init_detector, inference_detector
import mmcv
MS-COCO 데이터 기반으로 Faster RCNN Pretrained 모델을 활용하여 Inference 수행
- Faster RCNN Pretrained 모델 다운로드
- Faster RCNN용 Config 파일 설정.
- Inference 용 모델을 생성하고, Inference 적용
# pretrained weight 모델을 다운로드 받기 위해서 mmdetection/checkpoints 디렉토리를 만듬.
!cd mmdetection; mkdir checkpoints

!wget -O /content/mmdetection/checkpoints/faster_rcnn_r50_fpn_1x_coco_20200130-047c8118.pth http://download.openmmlab.com/mmdetection/v2.0/faster_rcnn/faster_rcnn_r50_fpn_1x_coco/faster_rcnn_r50_fpn_1x_coco_20200130-047c8118.pth
# config 파일을 설정하고, 다운로드 받은 pretrained 모델을 checkpoint로 설정.
config_file = '/content/mmdetection/configs/faster_rcnn/faster_rcnn_r50_fpn_1x_coco.py'
checkpoint_file = '/content/mmdetection/checkpoints/faster_rcnn_r50_fpn_1x_coco_20200130-047c8118.pth'
# config 파일과 pretrained 모델을 기반으로 Detector 모델을 생성.
from mmdet.apis import init_detector, inference_detector

# init_detector : pretrained model을 가져오는 것
model = init_detector(config_file, checkpoint_file, device='cuda:0')
# 상대경로로 불러오고 싶다면?
# mmdetection은 상대 경로를 인자로 주면 무조건 mmdetection 디렉토리를 기준으로 함.
%cd mmdetection

from mmdet.apis import init_detector, inference_detector

# init_detector() 인자로 config와 checkpoint를 입력함.
model = init_detector(config='configs/faster_rcnn/faster_rcnn_r50_fpn_1x_coco.py', checkpoint='checkpoints/faster_rcnn_r50_fpn_1x_coco_20200130-047c8118.pth')
import cv2
import matplotlib.pyplot as plt
img = '/content/mmdetection/demo/demo.jpg'

img_arr  = cv2.cvtColor(cv2.imread(img), cv2.COLOR_BGR2RGB)
plt.figure(figsize=(12, 12))
plt.imshow(img_arr)
img = '/content/mmdetection/demo/demo.jpg'
# inference_detector의 인자로 string(file경로), ndarray가 단일 또는 list형태로 입력 될 수 있음.
results = inference_detector(model, img)
type(results), len(results)
# 타입은 리스트로 되어있고 len이 80임. 그러나 object가 80개라는 것이 아니다!
(list, 80)
results는 list형으로 coco class의 0부터 79까지 class_id별로 80개의 array를 가짐.
개별 array들은 각 클래스별로 5개의 값(좌표값과 class별로 confidence)을 가짐. 개별 class별로 여러개의 좌표를 가지면 여러개의 array가 생성됨.
좌표는 좌상단(xmin, ymin), 우하단(xmax, ymax) 기준.
개별 array의 shape는 (Detection된 object들의 수, 5(좌표와 confidence)) 임
results
# 0번 class 부터 시작 3개가 detect 됨 = 사람 , 하지만 낮은 confidence score
# 1번 classs는 detect 안됨 = 자전거
# 2번 class는 detect 많이 됨 = 자동차
results[0].shape, results[1].shape, results[2].shape, results[3].shape
# 사람 = 3건 detect, 자전거 = 0건 detect, 차 = 46건 detect, 하지만 confidence score로 거른다.
((3, 5), (0, 5), (46, 5), (0, 5))
from mmdet.apis import show_result_pyplot
# inference 된 결과를 원본 이미지에 적용하여 새로운 image로 생성(bbox 처리된 image)
# Default로 score threshold가 0.3 이상인 Object들만 시각화 적용. show_result_pyplot은 model.show_result()를 호출.
show_result_pyplot(model, img, results)
Model의 Config 설정 확인하기
model.__dict__ # 모델 객체 안의 변수값 보기
#print(model.cfg)
print(model.cfg.pretty_text)
array를 inference_detector()에 입력할 경우에는 원본 array를 BGR 형태로 입력 필요(RGB 변환은 내부에서 수행하므로 BGR로 입력 필요)
import cv2

# imread 하면 RGB가 아닌 BGR로 입력된다. 그래서 BGR로 그냥 넣음. 알아서 변환이 된다.
img_arr = cv2.imread('/content/mmdetection/demo/demo.jpg')
img_arr2 = cv2.cvtColor(cv2.imread('/content/mmdetection/demo/demo.jpg'), cv2.COLOR_BGR2RGB)

results = inference_detector(model, img_arr)
results2 = inference_detector(model, img_arr2)

show_result_pyplot(model, img_arr, results)
show_result_pyplot(model, img_arr2, results2)

show_result_pyplot()을 이용하지 않고, inference 결과를 image로 표현하기
- model과 image array를 입력하면 해당 image를 detect하고 bbox 처리해주는 get_detected_img() 함수 생성.
- COCO 클래스 매핑은 0 부터 순차적으로 적용됨.
- results에 들어있는 array 값이 없는 경우는 해당 list의 index에 해당하는 class id값으로 object가 Detection되지 않은 것임.
- 개별 class의 score threshold가 낮은 값은 제외.
import numpy as np

# np.where 사용법 예시.
arr1 = np.array([[3.75348572e+02, 1.19171005e+02, 3.81950867e+02, 1.34460617e+02,
         1.35454759e-01],
        [5.32362000e+02, 1.09554726e+02, 5.40526550e+02, 1.25222633e+02,
         8.88786465e-01],
        [3.61124298e+02, 1.09049202e+02, 3.68625610e+02, 1.22483063e+02,
         7.20717013e-02]], dtype=np.float32)
print(arr1.shape)

arr1_filtered = arr1[np.where(arr1[:, 4] > 0.1)]
print('### arr1_filtered:', arr1_filtered, arr1_filtered.shape)
# 0번째, 첫번째가 출력이 된다.
np.where(arr1[:, 4] > 0.1)
# model과 원본 이미지 array, filtering할 기준 class confidence score를 인자로 가지는 inference 시각화용 함수 생성.
def get_detected_img(model, img_array,  score_threshold=0.3, is_print=True):
  # 인자로 들어온 image_array를 복사.
  draw_img = img_array.copy()
  bbox_color=(0, 255, 0) # 바운딩박스는 Green으로
  text_color=(0, 0, 255) # Text는 Red로 표현

  # model과 image array를 입력 인자로 inference detection 수행하고 결과를 results로 받음.
  # results는 80개의 2차원 array(shape=(오브젝트갯수, 5))를 가지는 list.
  results = inference_detector(model, img_array)

  # 80개의 array원소를 가지는 results 리스트를 loop를 돌면서 개별 2차원 array들을 추출하고 이를 기반으로 이미지 시각화
  # results 리스트의 위치 index가 바로 COCO 매핑된 Class id. 여기서는 result_ind가 class id
  # 개별 2차원 array에 오브젝트별 좌표와 class confidence score 값을 가짐.
  for result_ind, result in enumerate(results):
    # 개별 2차원 array의 row size가 0 이면 해당 Class id로 값이 없으므로 다음 loop로 진행.
    if len(result) == 0:
      continue

    # 2차원 array에서 5번째 컬럼에 해당하는 값이 score threshold이며 이 값이 함수 인자로 들어온 score_threshold 보다 낮은 경우는 제외.
    result_filtered = result[np.where(result[:, 4] > score_threshold)]

    # 해당 클래스 별로 Detect된 여러개의 오브젝트 정보가 2차원 array에 담겨 있으며, 이 2차원 array를 row수만큼 iteration해서 개별 오브젝트의 좌표값 추출.
    for i in range(len(result_filtered)):
      # 좌상단, 우하단 좌표 추출.
      left = int(result_filtered[i, 0])
      top = int(result_filtered[i, 1])
      right = int(result_filtered[i, 2])
      bottom = int(result_filtered[i, 3])
      caption = "{}: {:.4f}".format(labels_to_names_seq[result_ind], result_filtered[i, 4])
      cv2.rectangle(draw_img, (left, top), (right, bottom), color=bbox_color, thickness=2)
      cv2.putText(draw_img, caption, (int(left), int(top - 7)), cv2.FONT_HERSHEY_SIMPLEX, 0.37, text_color, 1)
      if is_print:
        print(caption)

return draw_img'🖼 Computer Vision > Object Detection' 카테고리의 다른 글
| CV - SSD (Single Shot Detector) (0) | 2022.05.17 |
|---|---|
| CV - 60분 컷 Image Classifier 파이토치 튜토리얼 (0) | 2022.05.13 |
| CV - Faster RCNN (2) | 2022.04.29 |
| CV - Fast RCNN (0) | 2022.04.28 |
| CV - SPPNet (Spatial Pyramid Pooling) (0) | 2022.04.28 |