1. OOP Lab 15(25pts)
Due Date : June 26 23 : 59
· Submit your assignment using the following file formats: LabNumber_StudentName_Student_ID.zip
Example: Lab15_Hongkildong_201620505.zip.
· The Zip file will contain both source file and report file
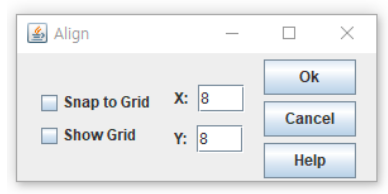
Q1. The Skeleton code to create the following GUI without any functionality is given. Hence, complete the skeleton code in files “Align.java” and “AlignFrame.java” under the folder CodeQ1. After completing the code, when you run the program, the following window is displayed (10pt)

Requirement 1: The title of the frame is Align
Requirement 2: The size of the frame is 300x140
Hint: Steps to put the above GUI components in a frame
Step 1: Creating two Check boxes
a) Create the two Check boxes:”Snap to Grid" and “Show Grid".
b) Put them inside “panel_1” which uses GridLayout( 2,1) as its layout manager.
Step 2.1: creating Jlabel and JTextField
a) Create Text Field with 8 and its label X
b) Put them inside “panel_2” which uses “FlowLayout” as its layout manager
Step 2.2: creating Jlabel and JTextFiled
a) Create Text Field with 8 and its Jlabel Y .
b) Put them inside “panel_3” which uses “FlowLayout” as its manager
Step 2.3: Put panel_2 and Panel_3 inside Pane_4 which uses Borderlayout() as its layout manager. So, put panel_2 inside panel_4 at North and panel_3 inside panel_4 at South.
Step 3: Creating three Buttons
a) Create “Ok” button.
b) Create “Cancel” button
c) Create “Help” button
d) Put them inside “pane1_5” which uses “GridLayout(3,1,10,5) as its layout manager
Step 4: Put Panel_1, panel_4 and panel_5inside the frame using FlowLayout(FlowLayout.CENTER, 10, 5));
// Align.java
// Testing AlignFrame.
import javax.swing.JFrame;
public class Align
{
public static void main(String[] args)
{
AlignFrame frame = new AlignFrame();
frame.setTitle("Align");
frame.setSize(300,140);
frame.setVisible(true);
}
} // end class Align
// AlignFrame.java
// Program creates a simple GUI.
import java.awt.GridLayout;
import java.awt.BorderLayout;
import java.awt.FlowLayout;
import javax.swing.JFrame;
import javax.swing.JButton;
import javax.swing.JTextField;
import javax.swing.JCheckBox;
import javax.swing.JLabel;
import javax.swing.JPanel;
public class AlignFrame extends JFrame
{
// Step 0: Declare all the necessary GUI components here.
private JCheckBox CheckBox1;
private JCheckBox CheckBox2;
private JPanel CheckBoxPanel;
private JLabel X_Label;
private JLabel Y_Label;
private JTextField X_TextField;
private JTextField Y_TextField;
private JPanel X_Panel;
private JPanel Y_Panel;
private JPanel Panel;
private JButton OkButton;
private JButton CancelButton;
private JButton HelpButton;
private JPanel ButtonPanel;
// constructor sets up GUI
public AlignFrame()
{
super("Align");
// Step 1.create two check boxes and store them in a panel_1
CheckBox1 = new JCheckBox("Snap to Grid");
CheckBox2 = new JCheckBox("Show Grid");
CheckBoxPanel = new JPanel();
GridLayout layout = new GridLayout(2,1); // 2행 1열로 layout 생성
CheckBoxPanel.setLayout(layout);
CheckBoxPanel.add(CheckBox1);
CheckBoxPanel.add(CheckBox2);
//Step 2.1 Create text fielded and its label and store then in Panel_2
X_Label = new JLabel("X:");
X_TextField = new JTextField("8");
X_Panel = new JPanel();
FlowLayout setlayoutX = new FlowLayout(); // 다음 라인으로 넘어감
X_Panel.setLayout(setlayoutX);
X_Panel.add(X_Label);
X_Panel.add(X_TextField);
//Step 2.2.Create text fielded and its label and store then in Panel_3
Y_Label = new JLabel("Y:");
Y_TextField = new JTextField("8");
Y_Panel = new JPanel();
FlowLayout setlayoutY = new FlowLayout();
Y_Panel.setLayout(setlayoutY);
Y_Panel.add(Y_Label);
Y_Panel.add(Y_TextField);
/* 2.3.Store Panel_2 and Panel_3 inside panel_4
by putting panel_2 at North and panel_3 at South.*/
Panel = new JPanel();
BorderLayout borderlayout = new BorderLayout();
Panel.setLayout(borderlayout);
Panel.add(X_Panel, BorderLayout.NORTH);
Panel.add(Y_Panel, BorderLayout.SOUTH);
// Step 3. Creating three Buttons and store them in panel_5
ButtonPanel = new JPanel();
OkButton = new JButton("Ok");
CancelButton = new JButton("Cancel");
HelpButton = new JButton("Help");
GridLayout buttongridlayout = new GridLayout(3, 1, 10, 5);
ButtonPanel.setLayout(buttongridlayout);
ButtonPanel.add(OkButton);
ButtonPanel.add(CancelButton);
ButtonPanel.add(HelpButton);
// Step 4:Put Panel_1, panel_4 and panel_5 inside frame
FlowLayout Centerlayout = new FlowLayout(FlowLayout.CENTER, 10, 5);
setLayout(Centerlayout);
add(CheckBoxPanel);
add(Panel);
add(ButtonPanel);
} // end AlignFrame constructor
} // end class AlignFrameQ2. The Skeleton code of an application that converts from Fahrenheit to Celsius is given. The Fahrenheit temperature should be entered from the keyboard via a JTextField. A JLabel should be used to display the converted temperature as shown in the following figure. Use the following formula for the conversion: Celsius = (5/9)*(Fahrenheit – 32). Complete the skeleton codes in files “Convert.java” and “ConverFrame.java” under “Code Q2” folder. After completing the code, you will get the following window when you run it( 10pt)
// Convert.java
// Temperature-conversion program
import javax.swing.JFrame;
public class Convert
{
public static void main(String[] args)
{
ConvertFrame frame = new ConvertFrame();
frame.setTitle("Temperature converter");
frame.setSize(225, 90);
frame.setVisible(true);
}
} // end class Convert// ConvertFrame.java
// Temperature-conversion program
import java.awt.BorderLayout;
import java.awt.event.ActionEvent;
import java.awt.event.ActionListener;
import javax.swing.JFrame;
import javax.swing.JLabel;
import javax.swing.JTextField;
public class ConvertFrame extends JFrame
{
// Step 1: Declare necessary Fields( GUI elements) of a frame
private JLabel text1;
private JTextField input;
private JLabel text2;
// constructor sets up GUI
public ConvertFrame()
{
super("Temperature converter");
/* Step 2:
a) Create label with text string "Enter Fahrenheit temperature:"
b) Create textfield with size 10 to store value of temperature */
text1 = new JLabel("Enter Fahrenheit temperature:");
input = new JTextField(10);
/* Step 3: register anonymous action listener
a) inside actionPerformed() method, do the convertion.
b) in actionPerformed() method, "Temperature in Celsius" is included.*/
input.addActionListener( new ActionListener()
{
public void actionPerformed(ActionEvent e)
{
int temperatureinput = Integer.parseInt(input.getText());
double Celcius = 5.0f/9.0f * (temperatureinput - 32);
text2.setText("Temperature in Celcius is: " + Celcius);
}
}
);
/* Step 4: Add the Enter Fahrenheit temperure(Jlabel),
blank textfiled(JTextField) and Temperature in Celsius(JTextFiled)
at north, center and South location of BorderLayout Manager */
text2 = new JLabel("Temperature in Celcius is:");
BorderLayout layout = new BorderLayout();
setLayout(layout);
add(text1,BorderLayout.NORTH);
add(input, BorderLayout.CENTER);
add(text2, BorderLayout.SOUTH);
} // end ConvertFrame constructor
} // end class ConvertFrame
화씨에서 섭씨로 변환되는 응용 프로그램의 스켈레톤 코드가 주어진다. 화씨 온도는 JTextField를 통해 키보드에서 입력되어야 한다. 다음 그림과 같이 변환된 온도를 표시하기 위해 JLabel을 사용해야 한다. 변환에는 다음 공식을 사용하십시오. 섭씨 = (5/9)*(화씨 – 32). 코드 Q2 폴더의 "Convert.java" 및 "ConverFrame.java" 파일에 있는 스켈레톤 코드를 완료하십시오. 코드를 완료한 후 실행하면 다음 창이 표시됨(10pt)
· Requirement 1: The title of the frame Temperature converter
· Requirement 2:The size of the frame is 225 x 90
· Requirement 3: The frame uses BorderLayout manager to put the following three components
· Requirement 4: Put JLabel with “Enter Fahrenheit temperature” at north location
· Requirement 5: Put JTextField( blank space) at Ceneter location and its length is 10
· Requirement 6 : Put JLabel with “Temperature in Celsius is: “ at south location
· Requirement 7: After entering value of Fahrenheit and press “enter key” .Then the output will be displayed on the above window
Q3. Program with one class that implements many types of Listener Interfaces(5pt).
· The program display the events that occur during the execution of an application.
· This can help you to understand when the events occur and how they’re generated.
· The source code of an application that enables the user to generate and process every event discussed in this chapter is given in files “Events.java” and EventsFrame.java.
· The application provides methods from the following interfaces to display messages when the events occur. toString() method is used to convert the event objects received in each event handler into Strings that can be displayed. toString () method creates a String containing all the information in the event object.
· 프로그램은 응용 프로그램 실행 중에 발생하는 이벤트를 표시한다.
· 이를 통해 이벤트가 언제 발생하며 어떻게 생성되는지 이해할 수 있다.
· 사용자가 이 장에서 논의된 모든 이벤트를 생성하고 처리할 수 있는 애플리케이션의 소스 코드는 "Events.java"와 EventsFrame.java 파일에 제공된다.
· 어플리케이션은 이벤트가 발생했을 때 메시지를 표시하기 위한 다음의 인터페이스의 방법을 제공한다. toString() 방법은 각 이벤트 핸들러에서 수신한 이벤트 객체를 표시할 수 있는 문자열로 변환하는 데 사용된다. toString() 메서드는 이벤트 객체의 모든 정보를 포함하는 문자열을 생성한다.
a) ActionListener Interfcae
b) ItemListener Interface
c) ListSelectionListener Interface
d) MouseListener Interface
e) MouseMotionListener Interface
f) KeyListener interfaces
a) Complete the partial code in the file in “Events.java” under “CodeQ3” folder.
· Requirement 1: The title of the frame is Events
· Requirement 2: The size of the frame is 375 X325
· Requirement 3: After completing the code in the file “Events.java”, when you run the program the following figure will be displayed.
b) After answering question (a), answer the following questions.
· Select from Combox box and then add the screen shot in your report file.
· Click the “clear” button and then add the screen shot in your report file.
· Click the ”select me” radio button and then add the screen shot in your report file.
· Select from “list” and then add the screen shot in your report file.
· Note: Since you have no time, the source code in the “EventsFrame.java” is given to you instead of asking you to write it. This source code helps you to under chapter 11 and chapter 12 together. Hence, to check yourself, I will advise you to implement
“EventsFrame.java” by yourself before reading the given code.
Answer
Click the "Combo box"
Select the "Clear" Button
Click "Select Me" Radio Button
Click "list" Button
'📌 java > Object-oriented Programming' 카테고리의 다른 글
| Homework_14 (0) | 2020.06.17 |
|---|---|
| Homework_13 (0) | 2020.06.09 |
| java - ArrayList (0) | 2020.06.09 |
| Homework_12 (0) | 2020.06.02 |
| Homework_11 (0) | 2020.05.30 |