1. 환경설정
아나콘다 가상환경에서 작업
cmake, dlib, imutils 필요한 라이브러리 설치
$ conda activate swc
$ pip install cmake
$ pip install opencv-contrib-python dlib
$ pip install imutils
2. 코드
import cv2 # opencv : 이미지 합성
import dlib # 얼굴 영역 탐지, 랜드마크 탐지
from imutils import face_utils, resize #
import numpy as np

orange_img = cv2.imread('orange.jpg') # 이미지를 opencv로 읽어와서 orange_img에 저장
orange_img = cv2.resize(orange_img, dsize=(512, 512)) # 가로 512, 세로 512로 resize 해준다.

detector = dlib.get_frontal_face_detector() # dlib의 얼굴 영역 탐지
predictor = dlib.shape_predictor('shape_predictor_68_face_landmarks.dat') # 랜드마크 탐지

cap = cv2.VideoCapture(0) # 0으로 하면 웹캠 캡쳐

while cap.isOpened():
    ret, img = cap.read() # read 로 이미지를 읽어준 다음에

    if not ret: # 프레임이 없으면 반복문 빠져 나와
        break

    faces = detector(img) # 얼굴영역을 인식해주면 faces에 좌표 정보가 들어간다.

    result = orange_img.copy() # result에 오렌지 이미지를 카피. 나중에 합성할때 쓰인다.

    if len(faces) > 0: # 얼굴이 1개 이상이면 실행
        face = faces[0] # 1개의 얼굴만 사용하므로 0번 인덱스만 face라는 변수에 저장

        x1, y1, x2, y2 = face.left(), face.top(), face.right(), face.bottom()
        face_img = img[y1:y2, x1:x2].copy() # face_img에 저장을 해준다

        shape = predictor(img, face) # 랜드마크 68개의 점 구하기
        shape = face_utils.shape_to_np(shape) # dlib 오브젝트를 numpy로 바꿔준다.

        for p in shape:
            cv2.circle(face_img, center=(p[0] - x1, p[1] - y1), radius=2, color=255, thickness=-1)

        # eyes
        le_x1 = shape[36, 0]
        le_y1 = shape[37, 1]
        le_x2 = shape[39, 0]
        le_y2 = shape[41, 1]
        le_margin = int((le_x2 - le_x1) * 0.18) # 눈에 따라 달라질 수 있음

        re_x1 = shape[42, 0]
        re_y1 = shape[43, 1]
        re_x2 = shape[45, 0]
        re_y2 = shape[47, 1]
        re_margin = int((re_x2 - re_x1) * 0.18)

        left_eye_img = img[le_y1-le_margin:le_y2+le_margin, le_x1-le_margin:le_x2+le_margin].copy()
        right_eye_img = img[re_y1-re_margin:re_y2+re_margin, re_x1-re_margin:re_x2+re_margin].copy()

        left_eye_img = resize(left_eye_img, width=100) # 가로 100 사이즈 resize
        right_eye_img = resize(right_eye_img, width=100)

        result = cv2.seamlessClone( # 푸아썸블랜딩 opencv의 seamlessClone 티가 안나게 합성해준다.
            left_eye_img, # 왼쪽눈 합성
            result, # result 에다가 합성
            np.full(left_eye_img.shape[:2], 255, left_eye_img.dtype),
            (150, 200),
            cv2.MIXED_CLONE # 옵션으로 MIXED_CLONE 하면 지가 알아서 합성해준다.
        )

        result = cv2.seamlessClone(
            right_eye_img, # 오른쪽 눈 합성
            result,
            np.full(right_eye_img.shape[:2], 255, right_eye_img.dtype),
            (300, 200),
            cv2.MIXED_CLONE
        )
        # 여기까지 하면 양쪽눈을 다 맞춘다.

        # mouth
        mouth_x1 = shape[48, 0]
        mouth_y1 = shape[50, 1]
        mouth_x2 = shape[54, 0]
        mouth_y2 = shape[57, 1]
        mouth_margin = int((mouth_x2 - mouth_x1) * 0.1)

        # 크롭해서 입 이미지 저장한다.
        mouth_img = img[mouth_y1-mouth_margin:mouth_y2+mouth_margin, mouth_x1-mouth_margin:mouth_x2+mouth_margin].copy()

        mouth_img = resize(mouth_img, width=250)

        result = cv2.seamlessClone(
            mouth_img,
            result,
            np.full(mouth_img.shape[:2], 255, mouth_img.dtype),
            (230, 320),
            cv2.MIXED_CLONE
        )

        # cv2.imshow('left', left_eye_img)
        # cv2.imshow('right', right_eye_img)
        # cv2.imshow('mouth', mouth_img)
        cv2.imshow('face', face_img)

        cv2.imshow('result', result)

    # cv2.imshow('img', img)
    if cv2.waitKey(1) == ord('q'):
        break
3. 코드 설명
import cv2 # opencv : 이미지 합성
import dlib # 얼굴 영역 탐지, 랜드마크 탐지
from imutils import face_utils, resize #
import numpy as np
cv2 는 이미지를 합성할 때 쓰이고,
dlib 은 얼굴영역 탐지, 랜드마크 영역 탐지,
imutils 는 이미지 resize 할 때 쓰이고,
numpy 는 형변환에 쓰인다.
orange_img = cv2.imread('orange.jpg') # 이미지를 opencv로 읽어와서 orange_img에 저장
orange_img = cv2.resize(orange_img, dsize=(512, 512)) # 가로 512, 세로 512로 resize 해준다.

detector = dlib.get_frontal_face_detector() # dlib의 얼굴 영역 탐지
predictor = dlib.shape_predictor('shape_predictor_68_face_landmarks.dat') # 랜드마크 탐지
dlib의 페이스 디텍터를 사용해서 얼굴 영역을 탐지를 해주고,
shape_predictor는 68개의 얼굴 랜드마크를 탐지하는 프로그램이며,
이 프로그램으로 얼굴 형, 눈, 입 등을 구분을 시켜준다.
처음 이용해보는 프로그램이라 굉장히 신기했다!
68개의 랜드마크
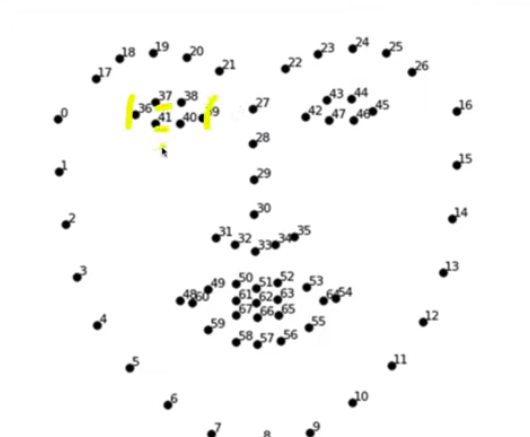
왼쪽눈 shape 36
x1 36, x2 39
cap = cv2.VideoCapture(0) # 0으로 하면 웹캠 캡쳐VideoCapture
opencv의 비디오 캡쳐로 웹캠으로 탐지할 수 있는 방법이 있다는 것도 알게 되었다.
그래서 while문을 돌면서 계속 내 얼굴을 탐지를 한다.
프레임 안에 있는 내 얼굴을 계속해서 따면서 Cap.read()로 계속해서 이미지를 읽어준 다음
while cap.isOpened():
    ret, img = cap.read() # read 로 이미지를 읽어준 다음에

    if not ret: # 프레임이 없으면 반복문 빠져 나와
        break

    faces = detector(img) # 얼굴영역을 인식해주면 faces에 좌표 정보가 들어간다.
프레임이 더 없으면 이 반복문 빠져나오고
Detector
디텍터는 얼굴영역을 인식해주는데, faces에 좌표 정보가 들어간다.
    if len(faces) > 0: # 얼굴이 1개 이상이면 실행
        face = faces[0] # 1개의 얼굴만 사용하므로 0번 인덱스만 face라는 변수에 저장

        x1, y1, x2, y2 = face.left(), face.top(), face.right(), face.bottom()
        face_img = img[y1:y2, x1:x2].copy() # face_img에 저장을 해준다

        shape = predictor(img, face) # 랜드마크 68개의 점 구하기
        shape = face_utils.shape_to_np(shape) # dlib 오브젝트를 numpy로 바꿔준다.
그래서 얼굴이 1개 이상이면
내 얼굴인 0번 인덱스에서 가져 온다.
얼굴이 두개면 0 ,1번 인덱스를 다 쓸 수 있나는 확인 못해봤는데, 아마 될 것이다.
이렇게 face라는 변수에 저장해주고
x1, y1, x2, y2 변수에 저장해주고
얼굴만 잘라서 face_img에 저장을 해준다.
68개의 점을 이용해서 얼굴의 좌표를 나타내주는 모델인 shape predictor, 아까 위에서 가져왔었다.
이걸 이용해주고
이게 shape dlib 오브젝트로 되어있는데, 이것을 넘파이로 바꿔 준다.
처음에 넘파이를 임포트할때 왜 해줄까를 여기서 알게 되었다.
여기서 알게 된 내용은 이미지 연산을 위해서 넘파이 연산을 활용한다고 한다.
opencv에서도 이미지 연산을 하는 함수가 있는데
numpy 연산 결과와 OpenCV 연산 함수를 활용한 연산 결과가 서로 다르다고 한다.
어떻게 다른지는 조금 공부를 해봐야 될거 같다.
        for p in shape:
            cv2.circle(face_img, center=(p[0] - x1, p[1] - y1), radius=2, color=255, thickness=-1)

        # eyes
        le_x1 = shape[36, 0]
        le_y1 = shape[37, 1]
        le_x2 = shape[39, 0]
        le_y2 = shape[41, 1]
        le_margin = int((le_x2 - le_x1) * 0.18) # 눈에 따라 달라질 수 있음

        re_x1 = shape[42, 0]
        re_y1 = shape[43, 1]
        re_x2 = shape[45, 0]
        re_y2 = shape[47, 1]
        re_margin = int((re_x2 - re_x1) * 0.18)

        left_eye_img = img[le_y1-le_margin:le_y2+le_margin, le_x1-le_margin:le_x2+le_margin].copy()
        right_eye_img = img[re_y1-re_margin:re_y2+re_margin, re_x1-re_margin:re_x2+re_margin].copy()

        left_eye_img = resize(left_eye_img, width=100) # 가로 100 사이즈 resize
        right_eye_img = resize(right_eye_img, width=100)
랜드마크로 눈이랑 눈썹 코, 코끝, 윗입술, 아랫입술, 얼굴형 이렇게 분리를 해주었다.
그리고 이제부터 왼쪽 눈을 잘라주는데
랜드마크의 번호가 다 있다.
그래서 왼쪽눈의 x축 가장 왼쪽 부분인 36과 가장 오른쪽 부분인 39
y축의 가장 위인 37과 아래의 41로 설정을 해주고,
이 인덱스로 사용해서 구한 다음
너무 타이트하게 자르면 안되기 때문에 margin을 준다.
margin 사이즈도 조절해보면 0.5 값으로 넣어보면 더 크게 네모나게 잘리고,
더 작게 조절하면 눈이 조금 잘렸다.
그래서 왼쪽눈을 이렇게 설정을 해주고
똑같이 오른쪽눈도 설정 해주고
왼쪽 눈과 오른쪽눈에 마진을 줘서 잘라준다.
이렇게 자른 후에 left eye img와 right eye img에 저장 해주고
다시 resize 해준 다음,
        result = cv2.seamlessClone( # 푸아썸블랜딩 opencv의 seamlessClone 티가 안나게 합성해준다.
            left_eye_img, # 왼쪽눈 합성
            result, # result 에다가 합성
            np.full(left_eye_img.shape[:2], 255, left_eye_img.dtype),
            (150, 200),
            cv2.MIXED_CLONE # 옵션으로 MIXED_CLONE 하면 지가 알아서 합성해준다.
        )

        result = cv2.seamlessClone(
            right_eye_img, # 오른쪽 눈 합성
            result,
            np.full(right_eye_img.shape[:2], 255, right_eye_img.dtype),
            (300, 200),
            cv2.MIXED_CLONE
        )
        # 여기까지 하면 양쪽눈을 다 맞춘다.
opencv에 seamlessClone 이라는 티가 안나게 합성을 해주는 메쏘드를 이용해서 합성을 해준다.
공식문서 가보면 mixedclone 말고 normal clone이랑 monocrome transfer 옵션으로 바꿔줄 수 있는데,
셋 다 해봤는데 믹스드 클론이 가장 자연스러웠던거 같다.
다른건 너무 네모나게 잘렸나 그랬던거 같다.
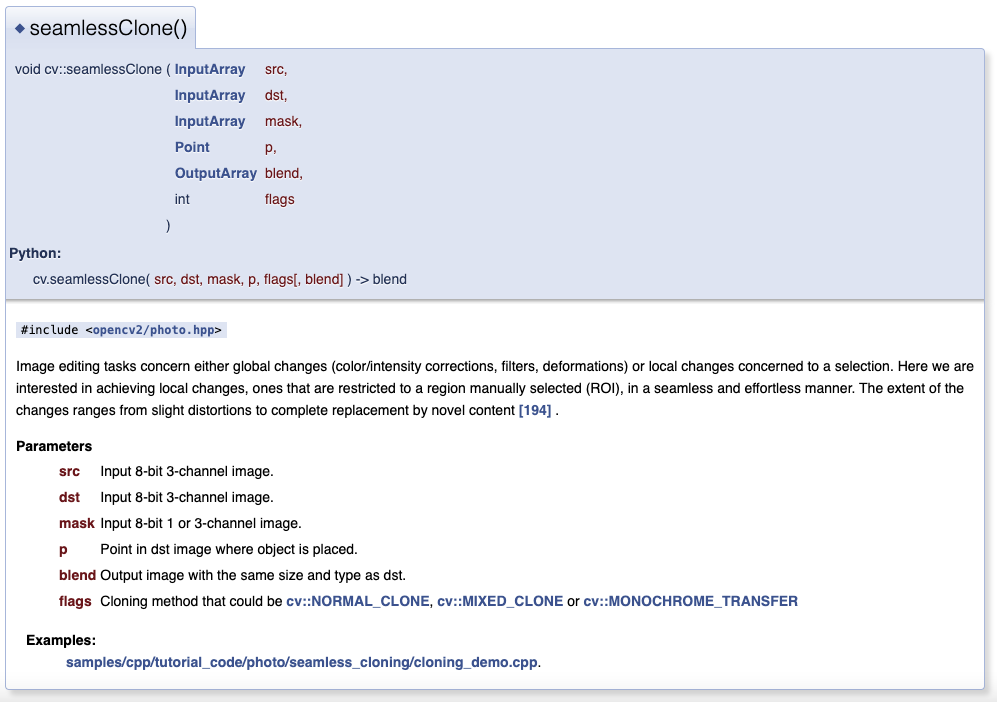
seamlessClone을 이용해서
왼쪽 눈과 오른쪽 눈을 아까 그 오렌지 이미지에 합성을 해준다.
# mouth
mouth_x1 = shape[48, 0]
mouth_y1 = shape[50, 1]
mouth_x2 = shape[54, 0]
mouth_y2 = shape[57, 1]
mouth_margin = int((mouth_x2 - mouth_x1) * 0.1)
# 크롭해서 입 이미지 저장한다.
mouth_img = img[mouth_y1-mouth_margin:mouth_y2+mouth_margin, mouth_x1-mouth_margin:mouth_x2+mouth_margin].copy()
mouth_img = resize(mouth_img, width=250)
result = cv2.seamlessClone(
mouth_img,
result,
np.full(mouth_img.shape[:2], 255, mouth_img.dtype),
(230, 320),
cv2.MIXED_CLONE
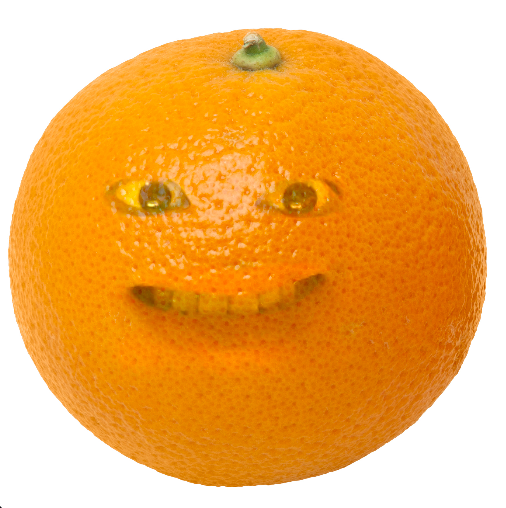
)똑같이 입도
눈처럼 쉐입 번호를 넣어서 잘라주고 resize하고 seamlessClone해서
결과를 보면 아래처럼 나온다.
4. 어노잉 페어 만들기
import cv2
import dlib
from imutils import face_utils, resize
import numpy as np

orange_img = cv2.imread('pear.jpg') # pear 이미지 read
orange_img = cv2.resize(orange_img, dsize=(700, 700)) # 사이즈 변경

detector = dlib.get_frontal_face_detector()
predictor = dlib.shape_predictor('shape_predictor_68_face_landmarks.dat')

cap = cv2.VideoCapture(0)
while cap.isOpened():
    ret, img = cap.read()

    if not ret:
        break

    faces = detector(img)

    result = orange_img.copy()

    if len(faces) > 0:
        face = faces[0]

        x1, y1, x2, y2 = face.left(), face.top(), face.right(), face.bottom()
        face_img = img[y1:y2, x1:x2].copy()

        shape = predictor(img, face)
        shape = face_utils.shape_to_np(shape)

        for p in shape:
            cv2.circle(face_img, center=(p[0] - x1, p[1] - y1), radius=2, color=255, thickness=-1)

        # eyes
        le_x1 = shape[36, 0]
        le_y1 = shape[37, 1]
        le_x2 = shape[39, 0]
        le_y2 = shape[41, 1]
        le_margin = int((le_x2 - le_x1) * 0.18)

        re_x1 = shape[42, 0]
        re_y1 = shape[43, 1]
        re_x2 = shape[45, 0]
        re_y2 = shape[47, 1]
        re_margin = int((re_x2 - re_x1) * 0.18)

        left_eye_img = img[le_y1-le_margin:le_y2+le_margin, le_x1-le_margin:le_x2+le_margin].copy()
        right_eye_img = img[re_y1-re_margin:re_y2+re_margin, re_x1-re_margin:re_x2+re_margin].copy()

        left_eye_img = resize(left_eye_img, width=100)
        right_eye_img = resize(right_eye_img, width=100)

        result = cv2.seamlessClone(
            left_eye_img,
            result,
            np.full(left_eye_img.shape[:2], 255, left_eye_img.dtype),
            (300, 400), ###
            cv2.MIXED_CLONE
        )

        result = cv2.seamlessClone(
            right_eye_img,
            result,
            np.full(right_eye_img.shape[:2], 255, right_eye_img.dtype),
            (450, 400), ###
            cv2.MIXED_CLONE
        )

        # mouth
        mouth_x1 = shape[48, 0]
        mouth_y1 = shape[50, 1]
        mouth_x2 = shape[54, 0]
        mouth_y2 = shape[57, 1]
        mouth_margin = int((mouth_x2 - mouth_x1) * 0.1)

        mouth_img = img[mouth_y1-mouth_margin:mouth_y2+mouth_margin, mouth_x1-mouth_margin:mouth_x2+mouth_margin].copy()

        mouth_img = resize(mouth_img, width=250)

        result = cv2.seamlessClone(
            mouth_img,
            result,
            np.full(mouth_img.shape[:2], 255, mouth_img.dtype),
            (380, 530), ###
            cv2.MIXED_CLONE
        )

        cv2.imshow('left', left_eye_img)
        cv2.imshow('right', right_eye_img)
        cv2.imshow('mouth', mouth_img)
        cv2.imshow('face', face_img)

        cv2.imshow('result', result)

    cv2.imshow('img', img)
    if cv2.waitKey(1) == ord('q'):
        break
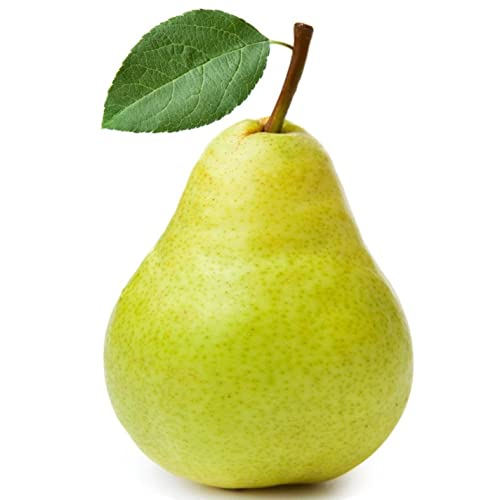
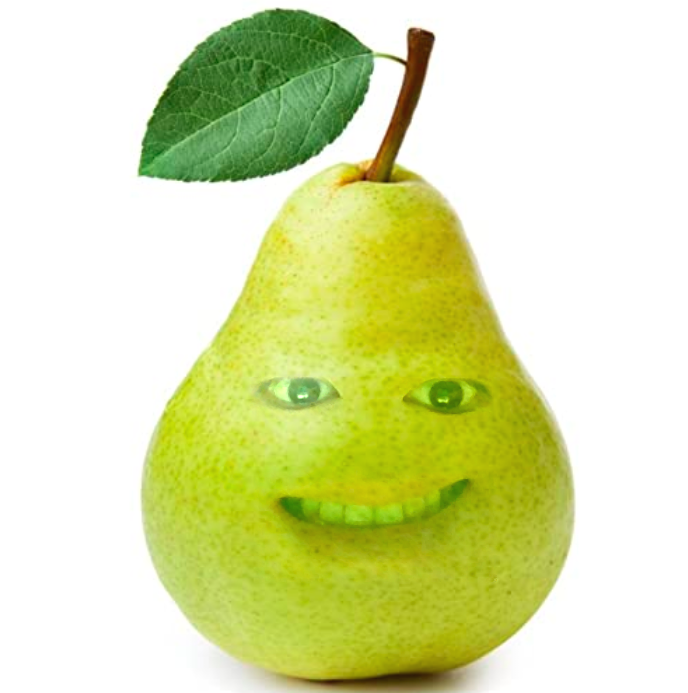
그리고 어노잉 오렌지에 등장하는 친구 중에서 배가 있었다.
우리나라 배는 다르게 생겼는데 미국 배는 저렇게 생겼나보다.
그래서 여기에다가도 합성을 해줬는데,
딱히 바꿔준거는 없고, 배 사이즈 변경해주고, 이미지 사이즈가 다르기 때문에, 자른 눈의 좌표를 다시 설정해주고,
입도 마찬가지로 다시 설정해주고,
이 미국 배에 붙여주면,
아래와 같이 나온다.
↓
'💡 AI > 토이 프로젝트' 카테고리의 다른 글
| 🧙 해리포터 투명망토 만들기 (0) | 2022.01.24 |
|---|---|
| Image Super Resolution (0) | 2022.01.24 |
| 🖕 뻐큐 모자이크 알고리즘 만들기 (1) | 2022.01.18 |
| YOLOv5 커스텀 학습 튜토리얼 (0) | 2021.10.18 |
| 물체추적으로 레드벨벳 누나들 따라다니는 직캠 만들기 (0) | 2021.10.09 |